
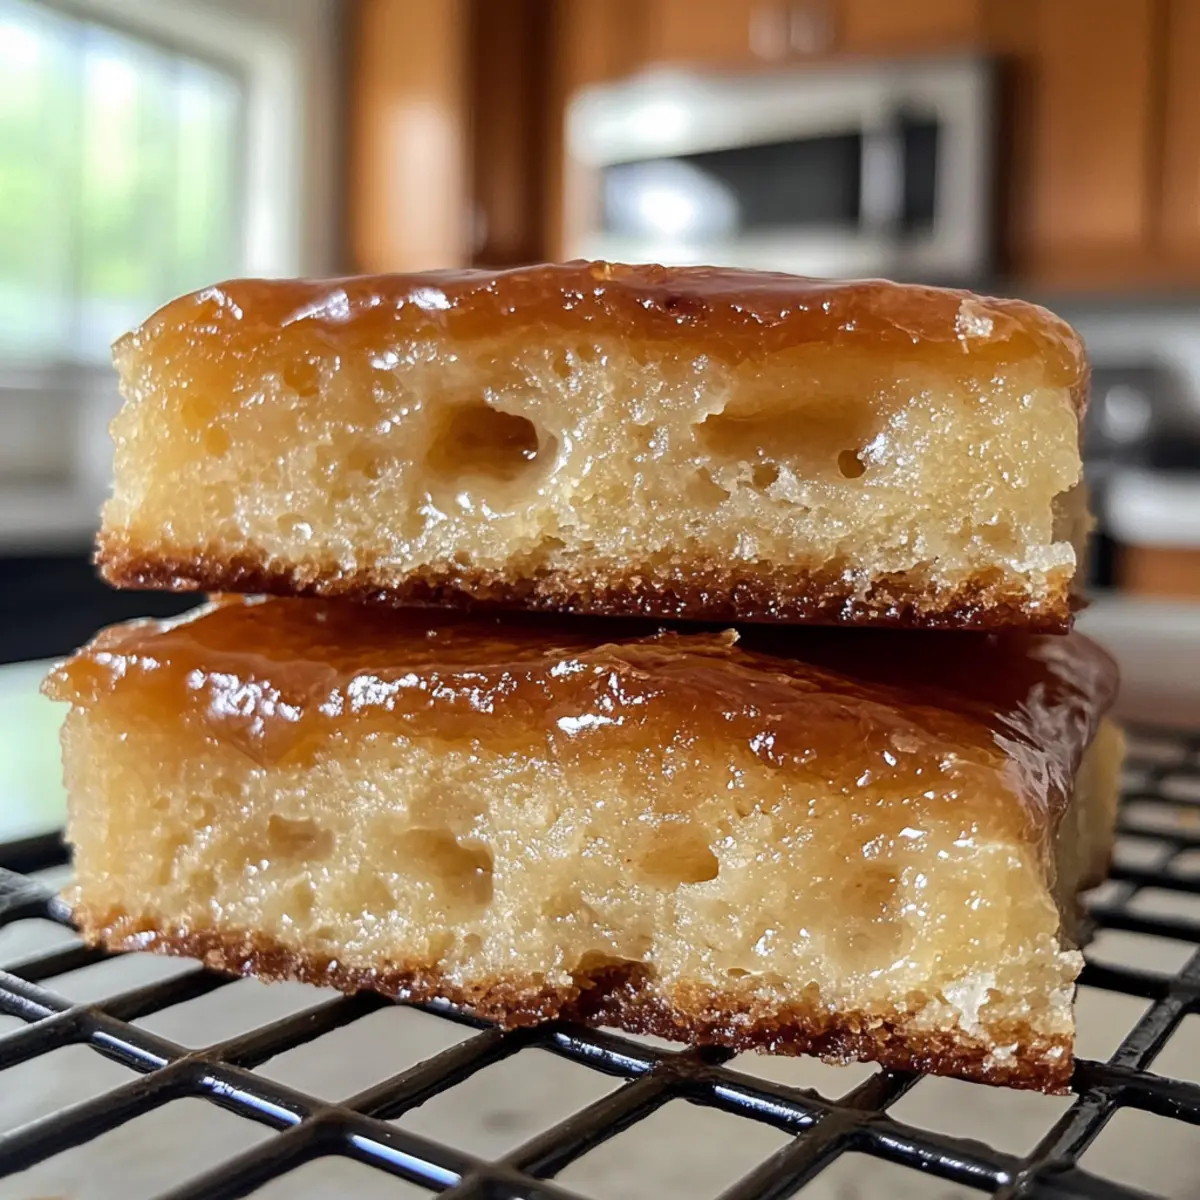
The aroma of warm maple and freshly baked goods wrapping around you like a cozy blanket—it’s an experience no one can resist. That’s exactly what I felt as I whipped up these delightful Baked Maple Donut Bars. A perfect blend of comfort and flavor, this recipe is especially designed for those of us who appreciate a homemade touch without the fuss. With its tender, cake-like structure and a glazed maple topping, this treat offers a healthier alternative to traditional fried donuts. And the best part? They’re beginner-friendly and customizable, making them a fantastic option for a sweet breakfast or an afternoon snack. Now, how about surprising your taste buds with a delicious twist on a classic treat?
Why Will You Love Maple Donut Bars?
Irresistible aroma wafting through your kitchen ensures these Maple Donut Bars become your new favorite treat. Beginner-friendly and foolproof, this recipe invites everyone to indulge in homemade goodness, regardless of skill level. Versatile substitutions allow you to customize flavors, making it easy to cater to any dietary needs. Perfect for breakfast or snacks, they’re a delightful way to wake up or satisfy your sweet cravings throughout the day. Plus, their healthier baked nature gives you the joy of a sweet treat without the guilt! If you’re looking for more delightful homemade recipes, check out these easy-to-follow tips to elevate your baking skills.
Maple Donut Bars Ingredients
• Here’s everything you need to create these delicious Maple Donut Bars!
For the Batter
- All-Purpose Flour – Provides structure and texture; you can substitute with whole wheat flour for added fiber.
- Baking Soda – Helps the bars rise for a light, fluffy texture; ensure it’s fresh for optimal results.
- Baking Powder – Enhances leavening alongside baking soda; make sure to verify the expiration date.
- Salt – Balances sweetness, enhancing overall flavor; use kosher salt for even dispersion.
- Ground Nutmeg – Adds warmth and aromatic notes; if needed, substitute with ground cinnamon for a different flavor profile.
- Granulated Sugar – Sweetens the batter; consider replacing it with coconut sugar for a healthier option.
- Unsalted Butter – Provides moisture and richness; you can replace it with coconut oil for a dairy-free version.
- Large Egg – Binds ingredients together, enhancing texture; for a vegan option, swap with a flax egg.
- Buttermilk – Adds tang and moisture; mix milk with vinegar to create a DIY buttermilk.
- Vanilla Extract – Enhances flavor; use pure vanilla extract for the best results.
For the Glaze
- Powdered Sugar – Used for the glaze; ensure to sift for a smooth consistency.
- Maple Syrup – The key flavor component for the glaze, and can be increased if you desire a stronger maple intensity.
- Maple Extract – Intensifies maple flavor; while optional, using real maple syrup can be a perfect substitute.
- Milk – Adjusts glaze consistency; choose either dairy or non-dairy variants based on your preference.
Step‑by‑Step Instructions for Maple Donut Bars
Step 1: Preheat the Oven
Begin by preheating your oven to 350°F (175°C). While the oven warms, prepare a 9×9-inch baking pan by lining it with parchment paper. This will ensure easy removal of your delicious Maple Donut Bars once they are baked.
Step 2: Mix the Dry Ingredients
In a mixing bowl, combine 2 cups of all-purpose flour, 1 teaspoon of baking soda, 1 teaspoon of baking powder, 1/2 teaspoon of salt, and 1/2 teaspoon of ground nutmeg. Use a whisk to blend these dry ingredients together thoroughly, allowing for an even distribution of leavening agents and spices. Set this mixture aside for later.
Step 3: Cream the Butter and Sugar
In a separate large bowl, cream together 1/2 cup of softened unsalted butter and 1 cup of granulated sugar using an electric mixer. Beat this mixture on medium speed until it turns light and fluffy, which should take about 3-4 minutes. This step is vital for creating that tender texture in your Maple Donut Bars.
Step 4: Incorporate Wet Ingredients
Next, mix in 1 large egg, 1 teaspoon of vanilla extract, and 1/2 cup of buttermilk into the creamed butter and sugar mixture. Continue mixing until all ingredients are fully incorporated and the mixture is smooth. Your batter will start to look cohesive and creamy, setting the stage for your delicious baked treats.
Step 5: Combine Dry and Wet Ingredients
Gradually add the bowl of dry ingredients into the wet mixture. Stir gently with a spatula until just combined, making sure not to overmix the batter. A few flour streaks are okay—this helps keep the Maple Donut Bars nice and soft once baked.
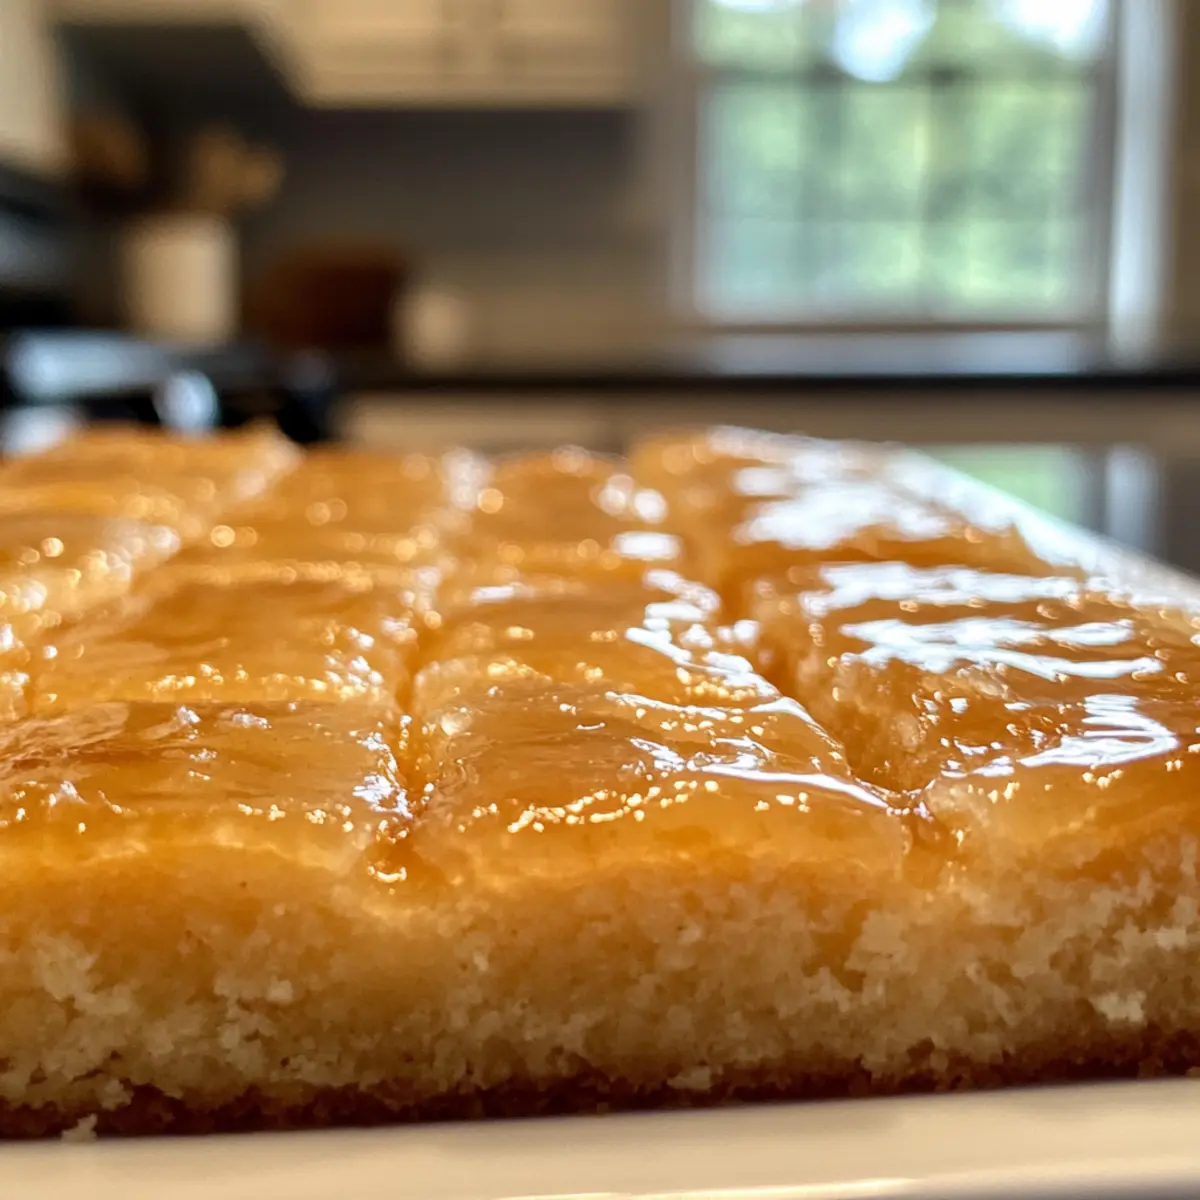
Step 6: Pour and Spread the Batter
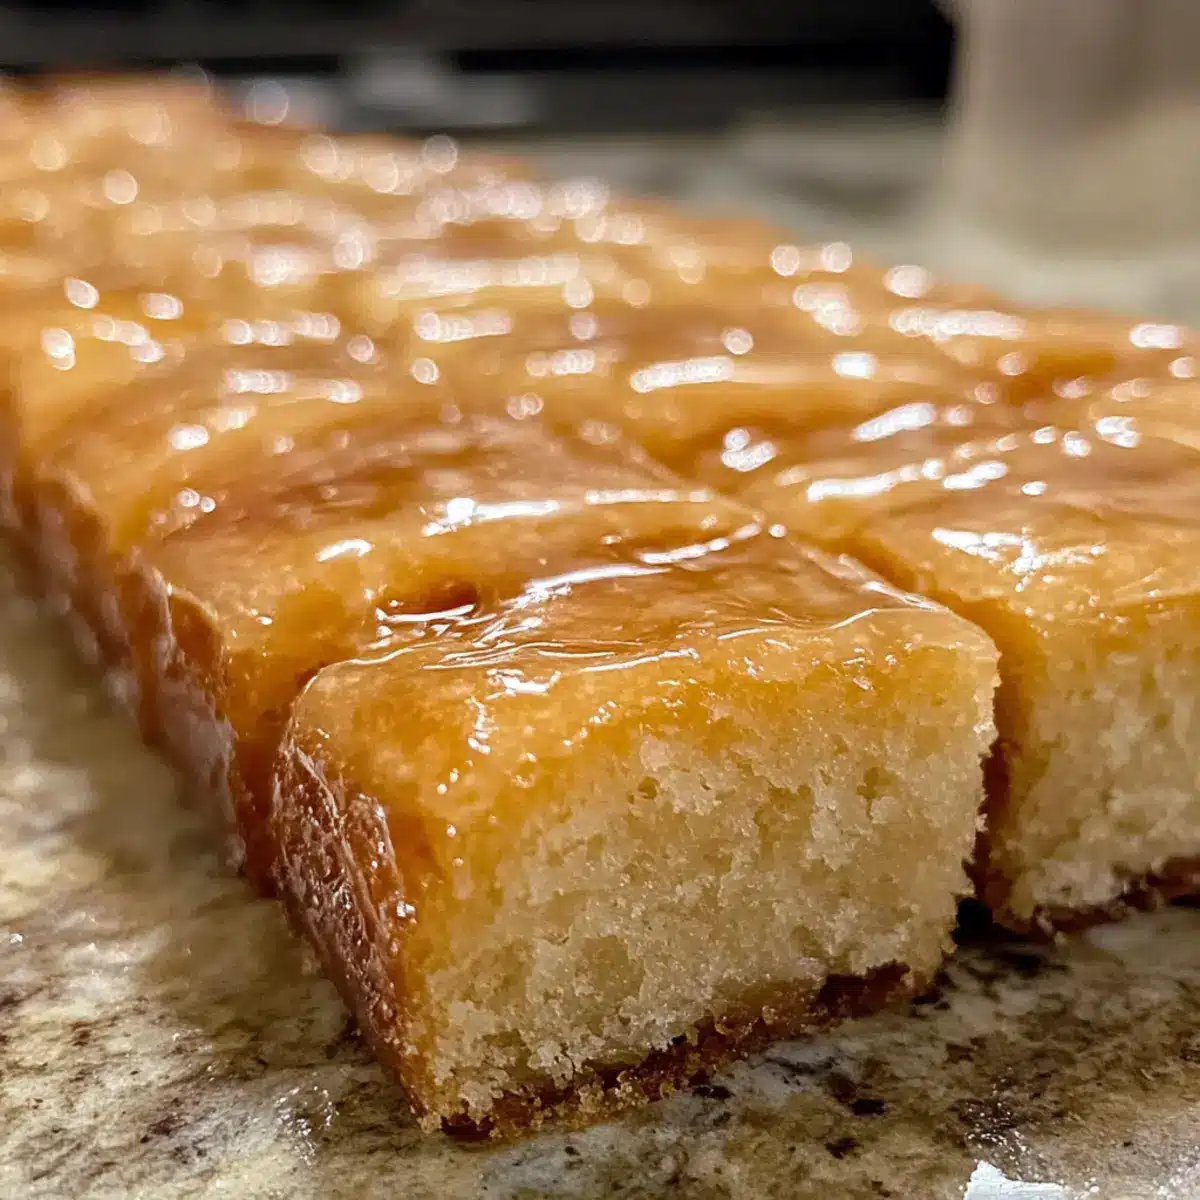
Pour the batter into the prepared baking pan, ensuring it spreads evenly. Use the spatula to smooth the top, so you’ll have a uniform surface for baking. This creates those delightful bars that everyone will love!
Step 7: Bake the Bars
Place the pan in the preheated oven and bake for 18-20 minutes. Keep an eye on your bars; they are done when a toothpick inserted in the center comes out clean. The edges should be lightly browned, providing a nice contrast to the soft center.
Step 8: Cool the Bars
Once baked, remove the pan from the oven and allow the bars to cool in the pan for about 10 minutes. After that, gently lift them out using the parchment paper and transfer the bars to a wire rack to cool completely. This step is essential to help them set properly before glazing.
Step 9: Prepare the Maple Glaze
While the bars cool, whisk together 1 cup of powdered sugar, 1/4 cup of maple syrup, 1/4 teaspoon of maple extract, and 1-2 tablespoons of milk in a medium bowl. Adjust the consistency to your liking; it should be smooth and pourable, perfect for enveloping those scrumptious Maple Donut Bars.
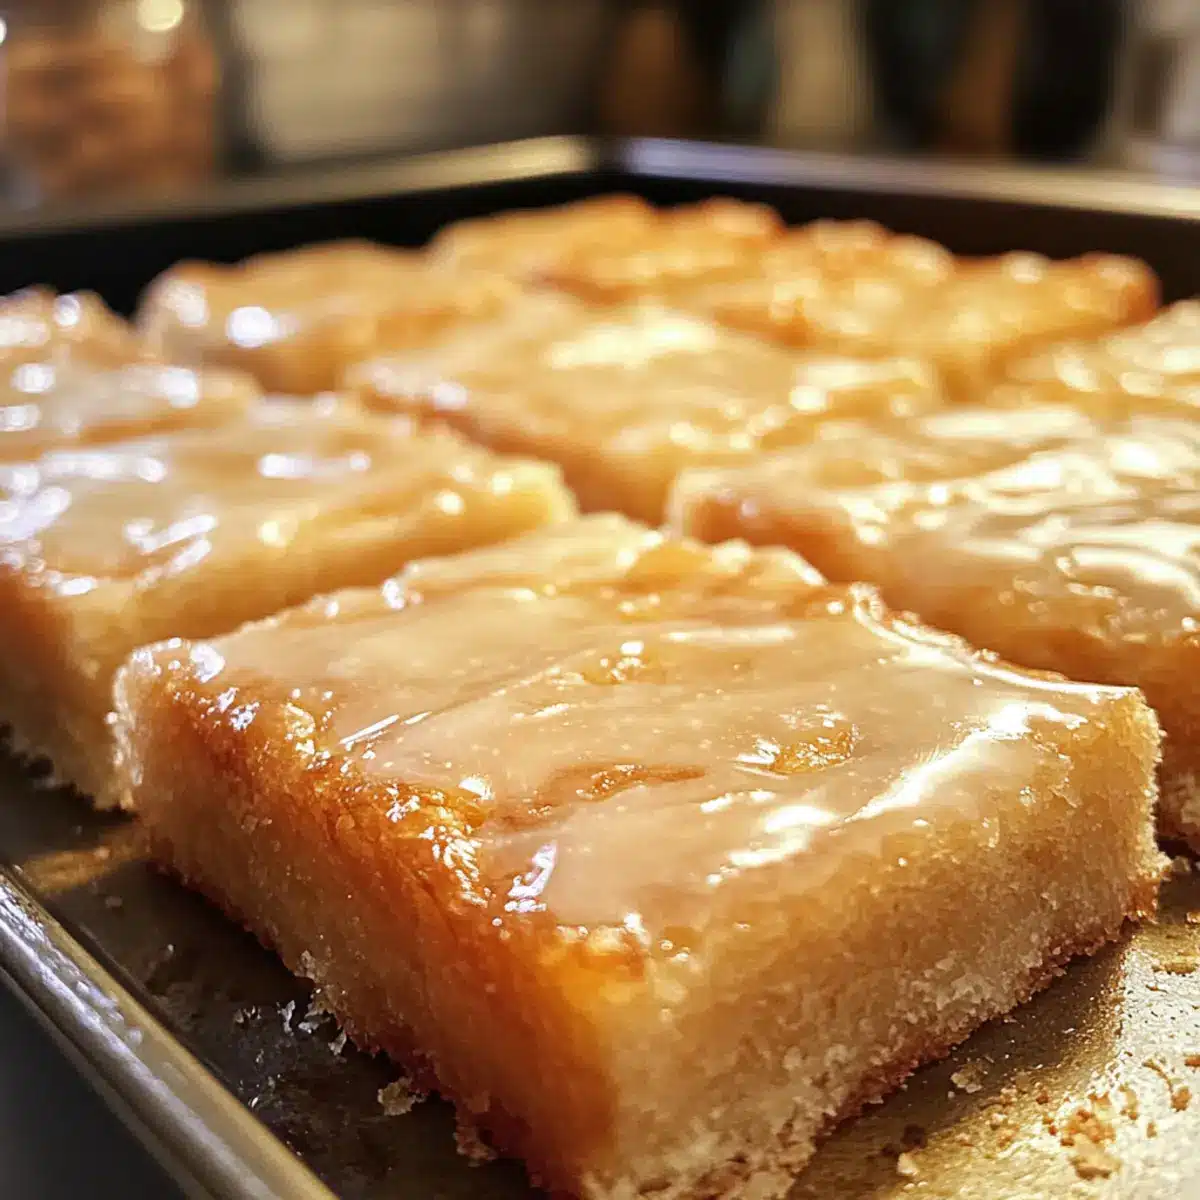
Step 10: Glaze the Donut Bars
Once the bars are completely cool, generously drizzle or spread the prepared glaze over the top. Let the glaze set for about 10–15 minutes before cutting the bars into squares. This ensures that the glaze firms up slightly, giving you that beautifully finished touch.
What to Serve with Maple Donut Bars
Indulging in a warm Maple Donut Bar creates comforting moments that deserve to be complemented perfectly.
- Fresh Seasonal Fruits: Serve alongside sliced apples or pears for a fresh, crisp contrast that balances sweetness.
- Coffee or Tea: The rich flavors of coffee or a warm cup of tea enhance the maple notes, elevating your breakfast experience.
- Whipped Cream: A dollop of lightly sweetened whipped cream adds a creamy texture, turning a simple snack into a delightful dessert.
- Yogurt Parfait: Pair with a yogurt parfait for a nutritious breakfast; the creaminess of yogurt complements the maple glaze beautifully.
- Nut Butter: A spread of almond or peanut butter provides a nutty richness that balances the sweetness and adds protein.
- Ice Cream or Gelato: For an indulgent twist, serve warm Maple Donut Bars with a scoop of vanilla ice cream, making a heavenly dessert.
- Maple Syrup Drizzle: Enhance the maple flavor by drizzling extra maple syrup on top—it’s an irresistible addition!
- Chocolate Milkshake: For a real treat, a chocolate milkshake brings a delightful sweet and creamy contrast to your bar’s maple glaze.
Maple Donut Bars: Creative Twists Await
Feel free to let your culinary imagination soar as you customize these delightful Maple Donut Bars!
- Gluten-Free: Substitute all-purpose flour with a gluten-free blend for a deliciously inclusive treat.
- Nutty Note: Add 1/2 cup of chopped walnuts or pecans to the batter for a delightful crunch in every bite. Nuts not only provide that extra texture but also enhance the flavor profile beautifully.
- Coconut Bliss: Replace granulated sugar with coconut sugar for a hint of caramel-like richness and a lower glycemic index. You’ll love the way it complements the maple!
- Berry Bliss: Fold in 1/2 cup of fresh or frozen blueberries or raspberries into the batter for a fruit-infused delight. The juicy bursts of fruit add a refreshing twist and a pop of color.
- Coffee Kick: Incorporate 1 tablespoon of instant espresso powder into the batter for a coffee-flavored donut bar. This twist brings out the maple flavor while giving you that morning pick-me-up.
- Choco-Mint: Swap in 1/4 cup of cocoa powder and a dash of peppermint extract for a chocolate-mint version—perfect for the holidays! Imagine a warm, inviting bar with a cool, minty finish.
- Cinnamon Swirl: Sprinkle a cinnamon-sugar mixture on top of the batter before baking for a delightful cinnamon roll touch. The warm spices resonate beautifully with the maple glaze.
- Spicy Ginger: Add 1 teaspoon of ground ginger to the batter to create a subtle spice kick! This variation offers a cozy warmth—a wonderful complement to the maple sweetness.
Feel free to explore these fun ideas, and for more delightful inspiration, check out my tips on how to add seasonal flavors to your baking!
Storage Tips for Maple Donut Bars
Room Temperature: Store the Maple Donut Bars in an airtight container at room temperature for up to 2 days to maintain their fresh texture.
Fridge: If you need to keep them longer, refrigerate the bars for up to 5 days. Just ensure they’re in a well-sealed container to avoid drying out.
Freezer: For extended storage, freeze the bars without glaze in a single layer for up to 1 month. Thaw in the fridge and glaze them just before serving.
Reheating: To enjoy them warm, microwave the bars for 10-15 seconds or until just heated through. This softens them back to that delightful, fresh-baked state!
Expert Tips for Maple Donut Bars
- Accurate Measurements: Always measure your flour correctly using the spoon-and-level method to avoid dense bars. Too much flour can lead to dryness in Maple Donut Bars.
- Cool Completely: Let the bars cool completely before adding the glaze. Glazing warm bars can cause the icing to melt away, losing that beautiful finish.
- Avoid Overmixing: Stir just until ingredients are combined when making the batter. Overmixing can result in tough bars, so keep it gentle!
- Test for Doneness: Check the bars a few minutes before the suggested baking time. They should be lightly golden and a toothpick inserted should come out clean.
- Storage Tips: For best results, store leftover Maple Donut Bars in an airtight container for up to 2 days. If you want them to last longer, freeze them without the glaze and add it later.
Make Ahead Options
These Maple Donut Bars are perfect for meal prep enthusiasts! You can prepare the batter up to 24 hours in advance by mixing all the dry ingredients and storing them in an airtight container. Additionally, you can whisk together the wet ingredients (butter, sugar, egg, buttermilk, and vanilla) and refrigerate them separately. When ready to bake, simply combine the wet and dry ingredients, pour into the prepared pan, and bake as directed. To maintain their soft texture, ensure you cool the bars completely before glazing. They’ll be just as delicious, giving you restaurant-quality results with minimal effort on those busy mornings!
Maple Donut Bars Recipe FAQs
What type of flour should I use for Maple Donut Bars?
For the best results, I recommend using all-purpose flour as it provides the right structure and texture. If you’re looking to add more fiber, whole wheat flour is a fantastic substitute!
How should I store Maple Donut Bars after baking?
Store your Maple Donut Bars in an airtight container at room temperature for up to 2 days. If you want them to last longer, refrigerate them for up to 5 days—just make sure they’re well-sealed to avoid drying out.
Can I freeze Maple Donut Bars?
Absolutely! For freezing, I suggest storing the bars without glaze in a single layer for up to 1 month. To do this, first cool the bars completely, then wrap them tightly in plastic wrap and place them in a freezer bag. When you’re ready to enjoy, thaw in the fridge and glaze them before serving for the best taste!
What can I do if my donut bars turn out dry?
If your Maple Donut Bars come out dry, it’s likely due to overbaking or measuring too much flour. Next time, check them a few minutes before the time is up. You can also add an extra tablespoon of buttermilk to the batter to help maintain moisture!
Are there any dietary considerations for Maple Donut Bars?
Yes! If you have dietary restrictions, you can make these bars dairy-free by substituting the butter with coconut oil and the buttermilk with a milk and vinegar mixture. For a vegan option, replace the egg with a flax egg (1 tablespoon of ground flaxseed mixed with 2.5 tablespoons of water) and use non-dairy milk. Always check ingredients for possible allergens!
How can I tell when my Maple Donut Bars are done baking?
To check for doneness, insert a toothpick into the center of the bars. If it comes out clean or with a few moist crumbs, they’re ready! The edges should be lightly golden, and the top should spring back when gently pressed. This ensures that the bars are baked through but still soft and tender.
Delicious Maple Donut Bars That Are Easy to Bake at Home
Ingredients
Equipment
Method
- Preheat your oven to 350°F (175°C) and line a 9x9-inch baking pan with parchment paper.
- In a mixing bowl, combine 2 cups of all-purpose flour, 1 teaspoon of baking soda, 1 teaspoon of baking powder, 1/2 teaspoon of salt, and 1/2 teaspoon of ground nutmeg. Whisk together and set aside.
- Cream together 1/2 cup of softened unsalted butter and 1 cup of granulated sugar using an electric mixer until light and fluffy for about 3-4 minutes.
- Mix in 1 large egg, 1 teaspoon of vanilla extract, and 1/2 cup of buttermilk into the creamed mixture until smooth.
- Gradually add the dry ingredients to the wet mixture and stir gently until just combined.
- Pour the batter into the prepared baking pan, smoothing the top with a spatula.
- Bake in the preheated oven for 18-20 minutes or until a toothpick in the center comes out clean.
- Allow the bars to cool in the pan for about 10 minutes, then transfer to a wire rack to cool completely.
- Whisk together 1 cup of powdered sugar, 1/4 cup of maple syrup, 1/4 teaspoon of maple extract, and 1-2 tablespoons of milk until smooth.
- Once cooled, drizzle or spread the glaze over the bars and let it set for about 10-15 minutes before cutting into squares.
Leave a Reply