
As autumn leaves begin to tumble and the air turns crisp, the kitchen transforms into a cozy haven filled with the enchanting aroma of spices and sweetness. I’m thrilled to share my No-Bake Pumpkin Cheesecake Truffles, an easy dessert that captures the essence of fall in every luscious bite. These festive treats come together quickly and require no baking, making them perfect for busy gatherings or a cozy night in. The creamy pumpkin cheesecake filling, coupled with the warmth of pumpkin pie spices, creates an irresistible indulgence that friends and family will adore. Plus, they’re a delight to assemble, offering a fun way to let your creativity shine. Curious about how to bring a touch of the season to your dessert table? Let’s dive in!
Why Are Pumpkin Cheesecake Truffles So Irresistible?
Irresistible for every occasion: These no-bake delights are perfect for Halloween gatherings, Thanksgiving feasts, or cozy holiday get-togethers.
Easy to Make: With minimal ingredients and simple steps, anyone can whip up these truffles without turning on the oven!
Crowd-Pleasing: Their creamy texture and warm spices will enchant friends and family, making them a must-have on any dessert table.
Versatile Treats: Drizzle them with chocolate or sprinkle with nuts for a fun twist; these truffles invite your creativity!
Looking for more pumpkin goodness? Check out my Pumpkin Cupcakes Brown for another fall favorite!
Pumpkin Cheesecake Truffles Ingredients
For the Filling
- 1 tablespoon butter – Adds richness and prevents the truffle mixture from sticking.
- 4 ounces cream cheese, softened – Creates a creamy texture and tangy balance.
- ½ cup canned pumpkin puree – Infuses the truffles with the signature fall flavor.
- 1 (14-ounce) can sweetened condensed milk – Provides sweetness for a delightful, smooth texture.
- 1 ½ teaspoons pumpkin pie spice – Brings in the familiar warming spice blend associated with autumn.
- ½ cup graham cracker crumbs – Gives a slight crunch and sweetness reminiscent of cheesecake crust.
- ⅓ cup white chocolate chips – Enhances the creamy filling with additional sweetness.
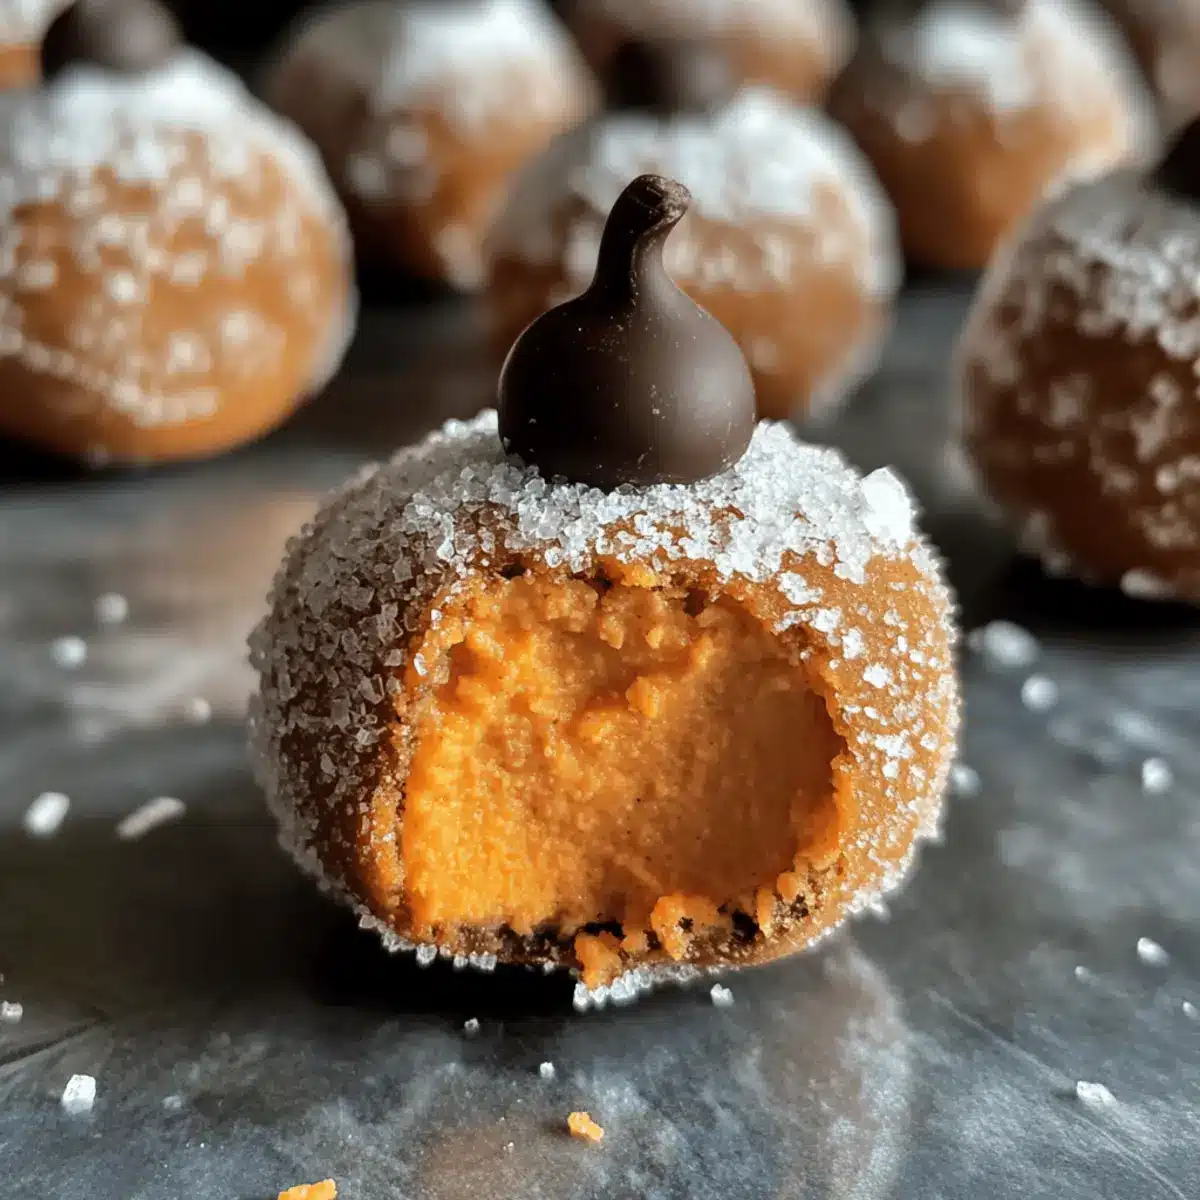
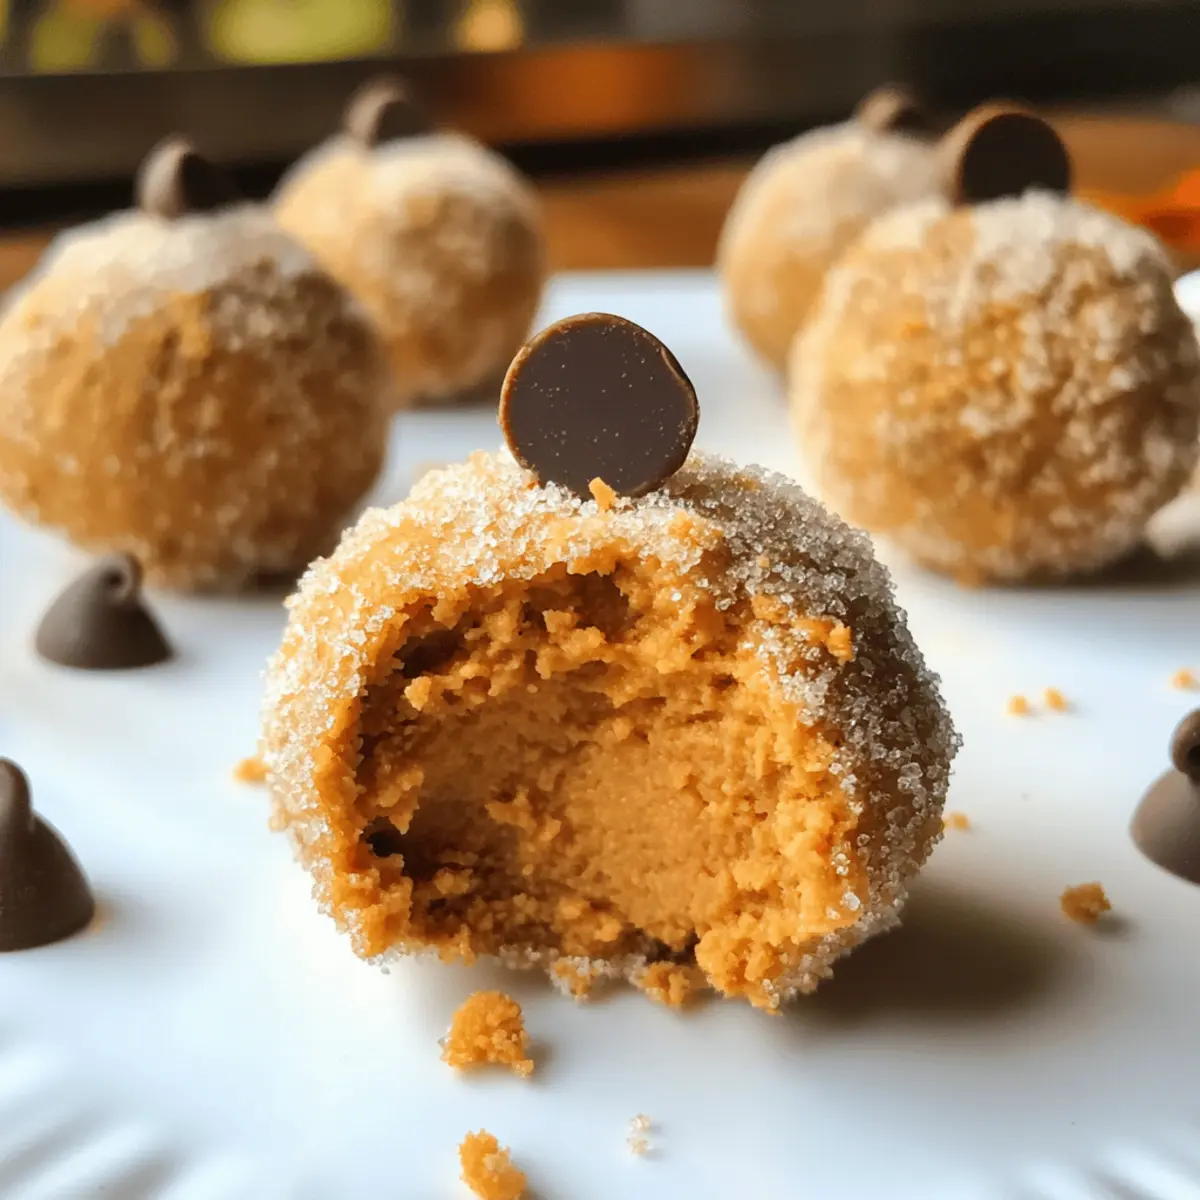
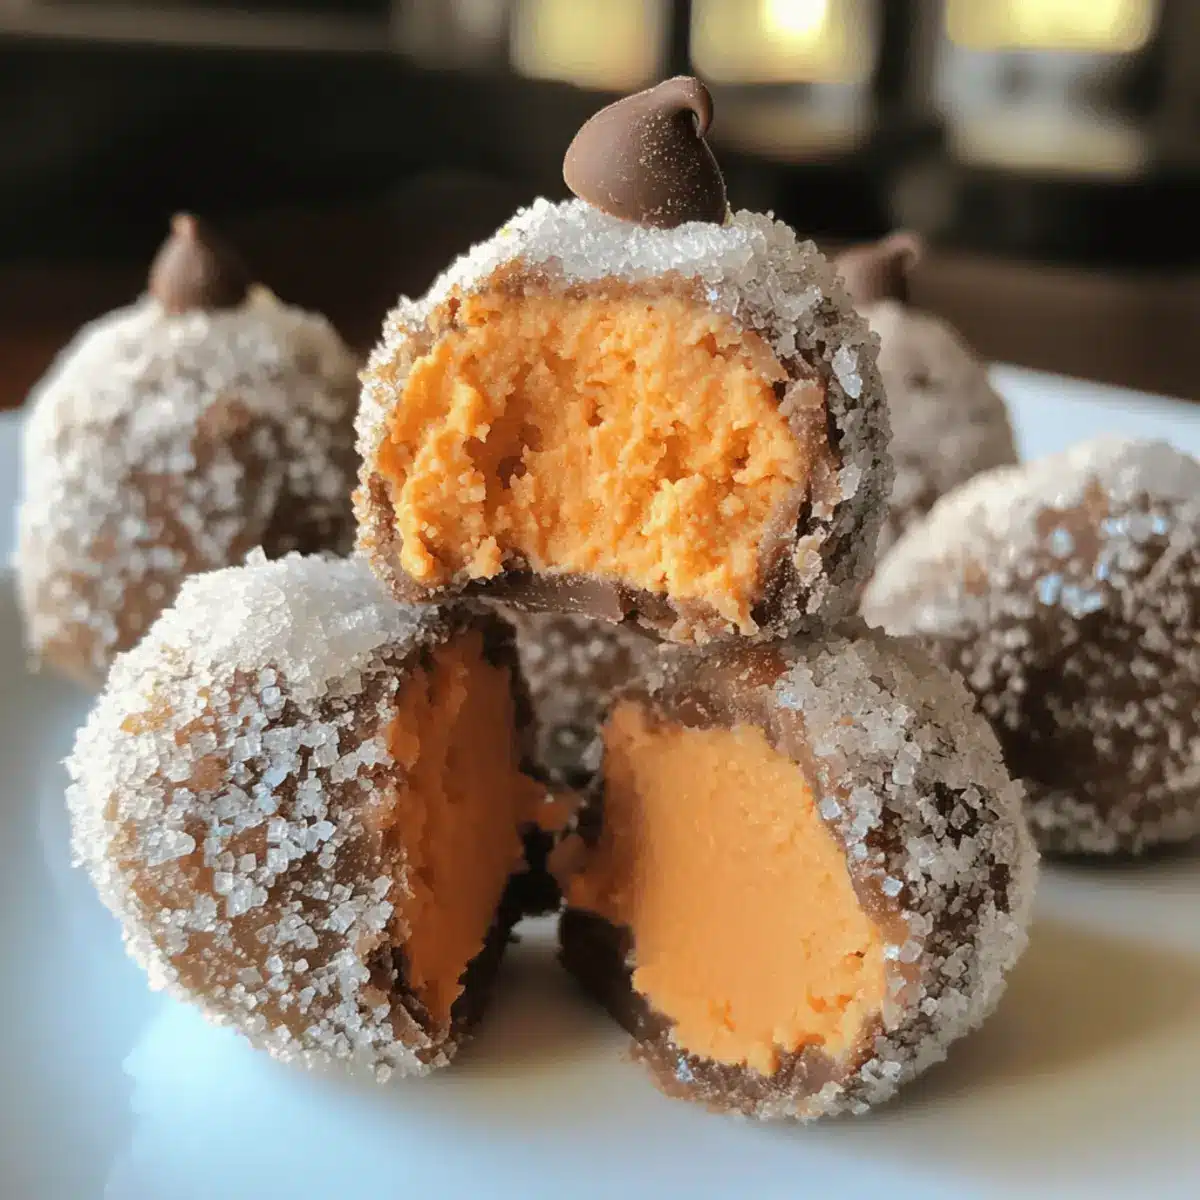
- Orange food coloring (optional) – Use to make your truffles visually resemble pumpkins.
- Granulated sugar (for rolling) – Adds sweetness and a sparkling finish to each truffle.
- Chocolate chips (for topping) – Mimics pumpkin stems and adds visual appeal.
These Pumpkin Cheesecake Truffles are bound to be the highlight of your dessert table this fall!
Step‑by‑Step Instructions for Pumpkin Cheesecake Truffles
Step 1: Cook the Filling
In a skillet set over medium heat, melt 1 tablespoon of butter. Add 4 ounces of softened cream cheese, ½ cup of canned pumpkin puree, a 14-ounce can of sweetened condensed milk, and 1 ½ teaspoons of pumpkin pie spice. Stir continuously until the mixture is thickened and well combined, about 5–7 minutes. You’ll know it’s ready when it becomes smooth and slightly glossy.
Step 2: Add Remaining Ingredients
Remove the skillet from heat and gently fold in ½ cup of graham cracker crumbs and ⅓ cup of white chocolate chips until fully incorporated. If desired, add orange food coloring for a festive touch. The mixture should be smooth and easily moldable, resembling a thick batter. Let it cool for a few minutes before transferring to the next step.
Step 3: Cool the Mixture
Spread the pumpkin cheesecake mixture evenly onto a butter-greased baking sheet, ensuring it’s about an inch thick. Cover with plastic wrap and place it in the refrigerator for at least 2 hours, or until firm to the touch. This resting period is essential for shaping the truffles perfectly.
Step 4: Form Truffles
Once chilled, rub a small amount of butter on your hands to prevent sticking, then scoop out portions of the mixture. Roll them into golf ball-sized balls, about 1 inch in diameter. Keep the truffles uniform in size for even coating. Place them on a parchment-lined tray as you shape them.
Step 5: Coat and Decorate
Roll each truffle in granulated sugar until well-coated, adding sweetness and a sparkling finish. Use a toothpick to gently create ridges on the surface for texture, then top each truffle with a chocolate chip, mimicking the pumpkin stem. These Pumpkin Cheesecake Truffles are delightful to look at and taste!
Step 6: Serve or Store
Your Pumpkin Cheesecake Truffles are now ready to be enjoyed! Serve them immediately for a festive treat or store them in the refrigerator until you’re ready to impress your guests. They can be made a day in advance, allowing the flavors to meld even further, making them an ideal make-ahead dessert for any fall gathering.

Expert Tips for Pumpkin Cheesecake Truffles
- Room Temperature Cream Cheese: Ensure your cream cheese is at room temperature for easy mixing, creating a smooth and creamy filling.
- Monitor Cooking Time: Avoid overcooking the filling. A light simmer is ideal to maintain that lovely creamy texture without it becoming too dense.
- Grease-Free Surface: When rolling truffles, use a non-stick surface or a parchment paper to prevent sticking and make shaping easier.
- Chill Thoroughly: Don’t skip chilling the mixture for at least 2 hours. This step helps the truffles hold their shape during rolling and decorating.
- Customize Coatings: Feel free to experiment! Try rolling in crushed nuts or coconut for extra crunch, or drizzle with chocolate for a gourmet touch.
- Storage Tips: Store excess Pumpkin Cheesecake Truffles in an airtight container in the fridge to keep them fresh and delicious for up to a week.
How to Store and Freeze Pumpkin Cheesecake Truffles
Fridge: Store your Pumpkin Cheesecake Truffles in an airtight container in the refrigerator for up to 1 week. This helps maintain their creamy texture and flavor.
Freezer: For longer storage, freeze the truffles in a single layer on a baking sheet until firm, then transfer them to a freezer-safe container. They can last for up to 3 months.
Reheating: Thaw frozen truffles in the fridge overnight before serving to regain their creamy goodness. Avoid microwaving, as it may alter their texture.
Make-Ahead Tip: These truffles can easily be prepared a day in advance, allowing the flavors to meld beautifully, making your hosting easy and efficient!
Pumpkin Cheesecake Truffles: Customizable Delights
Feel free to make these truffles uniquely yours by exploring different flavors and textures that dance with the essence of fall.
- Chocolaty Twist: Drizzle with melted chocolate on top for an extra layer of sweetness that chocolate lovers will adore.
- Nutty Texture: Incorporate crushed pecans or almonds into the filling for a delightful crunch that complements the creamy center.
- Flavor Variations: Substitute with flavored extracts, like vanilla or maple, to introduce new undertones and surprise your taste buds.
- Colorful Sprinkles: Decorate with seasonal sprinkles or edible glitter to make your truffles stand out at festive gatherings.
- Coconut Delight: Roll the truffles in toasted coconut flakes instead of sugar for a tropical twist that pairs beautifully with pumpkin.
- Spicy Kick: Add a pinch of cayenne pepper to the filling for a subtle heat, merging delightfully with the sweetness of the truffles.
- Fruit Infusion: Incorporate finely chopped dried cranberries or raisins to the mixture for bursts of tangy sweetness that dance in your mouth.
- Gluten-Free Option: Use crushed gluten-free cookies instead of graham cracker crumbs, ensuring everyone can join in the fun!
For more creative spins, you might enjoy my Pumpkin Cream Cheese or the heavenly Vanilla Pumpkin Marshmallow as other fabulous fall treats. Customize your pumpkin experience and savor each delightful bite!
Make Ahead Options
These Pumpkin Cheesecake Truffles are perfect for busy home cooks looking to save time! You can prepare the pumpkin cheesecake filling up to 24 hours in advance by following the initial steps, cooling the mixture, and rolling it into truffle shapes. Simply refrigerate them in an airtight container to maintain their fresh taste and creamy texture. When you’re ready to serve, roll them in sugar and add the chocolate chip tops right before serving; this ensures they remain beautifully coated and deliciously appealing. This make-ahead option allows for stress-free hosting and lets the flavors deepen for a more luscious treat!
What to Serve with Pumpkin Cheesecake Truffles
These delightful confections are just the start of a memorable autumn feast, creating a warm and inviting atmosphere that beckons friends and family to gather around.
- Spiced Apple Cider: The warm, fragrant notes of spiced apple cider complement the pumpkin flavors perfectly, making it a cozy drink pairing.
- Ginger Snap Cookies: These cookies add a crunchy texture and spiced sweetness that marries beautifully with the creamy truffles. Just imagine the flavors dancing together!
- Creamy Vanilla Ice Cream: This classic pairing brings a cool, velvety contrast to the rich truffles, enhancing their flavors while providing a delightful temperature variation.
- Pecan Pie: The nutty, buttery sweetness of pecan pie brings depth to your dessert table, reinforcing sweet autumn vibes and offering something for everyone.
- Autumn Salad: A fresh salad with mixed greens, apples, walnuts, and a honey mustard dressing provides a refreshing contrast to the rich truffles, balancing out the meal.
- Coffee or Espresso: The bittersweet notes of coffee brighten the palate after indulging in these treats, making it an ideal pairing for a cozy afternoon gathering.
- Pumpkin Spice Latte: Embrace the seasonal spirit by serving this beloved drink alongside your truffles, creating a comforting and festive experience.
- Caramel Sauce Drizzle: A drizzle of warm caramel sauce elevates each truffle, adding a sweet and gooey touch that enhances the overall experience.
- Cranberry Sauce: A tangy cranberry sauce can cut through the sweetness of the truffles, offering a refreshing palate cleanser that brightens every bite.
Pumpkin Cheesecake Truffles Recipe FAQs
What type of pumpkin puree should I use for the truffles?
Absolutely! Make sure to use pure canned pumpkin puree, not pumpkin pie filling, as the latter contains added sugars and spices that could alter the flavor and texture of your truffles.
How should I store the Pumpkin Cheesecake Truffles?
Store your truffles in an airtight container in the refrigerator for up to 1 week. This will keep them fresh and maintain their creamy texture. If you want to prepare them ahead of time, you can also freeze them.
Can I freeze these truffles, and if so, how?
Very! To freeze your Pumpkin Cheesecake Truffles, place them in a single layer on a baking sheet until firm, then transfer to a freezer-safe container. They can be frozen for up to 3 months. When you’re ready to enjoy them, simply thaw them in the fridge overnight for best results.
What if my truffle mixture is too sticky to roll?
No worries! If you find that your mixture is too sticky, chill it for an additional 30 minutes in the fridge. This will help firm it up, making it easier to roll into perfect balls. Also, applying a little butter to your hands can prevent sticking while shaping.
Are these truffles suitable for special diets?
Absolutely! You can easily make these truffles dairy-free by using coconut oil in place of butter and dairy-free cream cheese. For gluten-free options, substitute the graham cracker crumbs with crushed gluten-free cookies. Always check labels to ensure they meet specific dietary needs.
Can I add different flavors or toppings to the truffles?
The more the merrier! Feel free to experiment with flavors by drizzling the truffles with melted chocolate, adding crushed nuts for texture, or even using different extracts like vanilla or almond to elevate the filling. Get creative and have fun with your festive truffle designs!
Pumpkin Cheesecake Truffles: No-Bake Fall Delight for Everyone
Ingredients
Equipment
Method
- In a skillet set over medium heat, melt 1 tablespoon of butter. Add cream cheese, pumpkin puree, sweetened condensed milk, and pumpkin pie spice. Stir continuously until thickened, about 5-7 minutes.
- Remove from heat and fold in graham cracker crumbs and white chocolate chips. Add orange food coloring if desired. Let cool slightly.
- Spread mixture evenly onto a greased baking sheet, about 1 inch thick. Cover with plastic wrap and refrigerate for at least 2 hours.
- Once chilled, rub butter on hands and scoop out portions, rolling into 1-inch balls. Place on a parchment-lined tray.
- Roll each truffle in granulated sugar. Use a toothpick to create ridges for texture and top with a chocolate chip.
- Serve immediately or refrigerate until ready to serve. These truffles can be made a day in advance.
Leave a Reply