
“Did you hear about the latest TikTok sensation?” I overheard a friend breathlessly share at a gathering, sparking my curiosity. As a passionate home chef, I had to dive in and discover the magic of Baked Salmon Sushi Cups. This easy and delightful recipe transforms the beloved sushi experience into a convenient, baked appetizer that’s perfect for any occasion—whether it’s a snack between meals or a show-stopping party treat. With quick preparation and the ability to wow a crowd, these little bites of joy bring comfort and a sense of adventure to your table. So, are you ready to roll up your sleeves and create something unforgettable? Let’s explore this deliciously fun recipe!
Why Will You Love Baked Salmon Sushi Cups?
Fun and Viral: These Baked Salmon Sushi Cups are making waves on TikTok, proving that sushi can be both easy and approachable!
Delectable Fusion: They beautifully merge Japanese flavors with a modern twist that everyone can enjoy, captivating both sushi enthusiasts and newcomers alike.
Crowd-Pleasing Appeal: Perfectly bite-sized, these cups are an ideal appetizer for parties, snacking, or even a cozy night in—who wouldn’t love indulging in these little delights?
Quick Preparation: Easily whipped up in under an hour, they fit seamlessly into any busy schedule, making home-cooked sushi fun and accessible. If you’re a fan of appetizers, you might also enjoy our cheesecake stuffed baked apples.
Customization Galore: Feel free to swap out proteins or add in your favorite veggies—these bites are highly versatile, catering to your preferences and dietary needs! Explore even more savory flavors in our loaded baked potato soup.
With all these fantastic features, how can you resist giving this recipe a try?
Baked Salmon Sushi Cups Ingredients
For the Salmon Mixture
• Salmon – Fresh, cubed salmon is essential for rich flavor and a satisfying texture.
• Light Soy Sauce – Enhances umami flavor; consider low-sodium for a healthier twist.
• Kewpie Mayo – Adds creaminess and a subtle sweetness; regular mayo works too but tastes different.
• Sriracha – Provides heat; adjust to your spice preference for the perfect kick.
• Sesame Oil – Imparts a nutty aroma; feel free to swap for a neutral oil if desired.
For the Sushi Rice
• Sushi Rice – Sticky short-grain rice holds everything together; avoid using regular rice.
• Rice Vinegar – Balances sweetness in the rice; apple cider vinegar can be a good alternative.
• White Sugar – Sweetens the rice; can be omitted or substituted with honey.
For Assembly
• Nori Sheets – Wrap the rice and salmon for traditional flavor; extra sheets add crunch.
• Furikake – Optional seasoning that boosts umami; strongly recommended for added flavor.
• Green Onion – Freshens up the dish as a garnish; chives can work well as a substitute.
For Baking
• Cooking Spray – Keeps your cups from sticking; a little oil can be used as a substitute if needed.
Get ready to enjoy these delightful Baked Salmon Sushi Cups!
Step‑by‑Step Instructions for Baked Salmon Sushi Cups
Step 1: Cook the Sushi Rice
Begin by cooking the sushi rice according to package instructions, typically simmering it for about 20 minutes until tender. While the rice cooks, mix rice vinegar and sugar in a small bowl until the sugar dissolves. Once the rice is ready, gently fold the vinegar mixture into it, ensuring the rice is evenly coated. Set the seasoned rice aside to cool.
Step 2: Preheat the Oven
Preheat your oven to 400°F (200°C) to prepare for baking the Baked Salmon Sushi Cups. This temperature ensures that the salmon cooks evenly while the nori crisps up nicely, giving that delightful crunch. Being patient during the preheating step will promote best results later.
Step 3: Prepare the Salmon Mixture
In a medium bowl, combine the cubed salmon with light soy sauce, Kewpie mayo, sriracha, and sesame oil. Use a spatula to mix everything together until the salmon is well coated and the mixture is creamy. Set this savory salmon mixture aside while you assemble the sushi cups.
Step 4: Cut the Nori Sheets
Take your nori sheets and carefully cut them into four squares each, making sure they fit snugly in a muffin tin. Each square will serve as a delightful wrapper for your Baked Salmon Sushi Cups, providing that authentic sushi taste. Having these ready will streamline the assembly process.
Step 5: Assemble the Cups
Lightly grease each cup of the muffin tin with cooking spray or a little oil to prevent sticking. Place one nori square in each cup, pressing it gently against the bottom and sides. Spoon a layer of the seasoned sushi rice into each nori-lined cup, pressing down lightly to create a compact base for your sushi cups.
Step 6: Add the Salmon Mixture
With the rice set, it’s time to layer on the salmon mixture. Spoon a generous amount of the salmon mixture onto the rice in each cup, ensuring that it’s evenly distributed but not overflowing. This delightful topping will meld into the rice as it bakes, enhancing the flavors of your Baked Salmon Sushi Cups.
Step 7: Bake the Sushi Cups
Carefully transfer the muffin tin to your preheated oven and bake for about 15 minutes. Keep an eye on them; they should be beautifully golden and the salmon cooked through. A perfect bake will yield crispy edges around the nori and tender salmon that’s infused with flavor.
Step 8: Finish and Serve
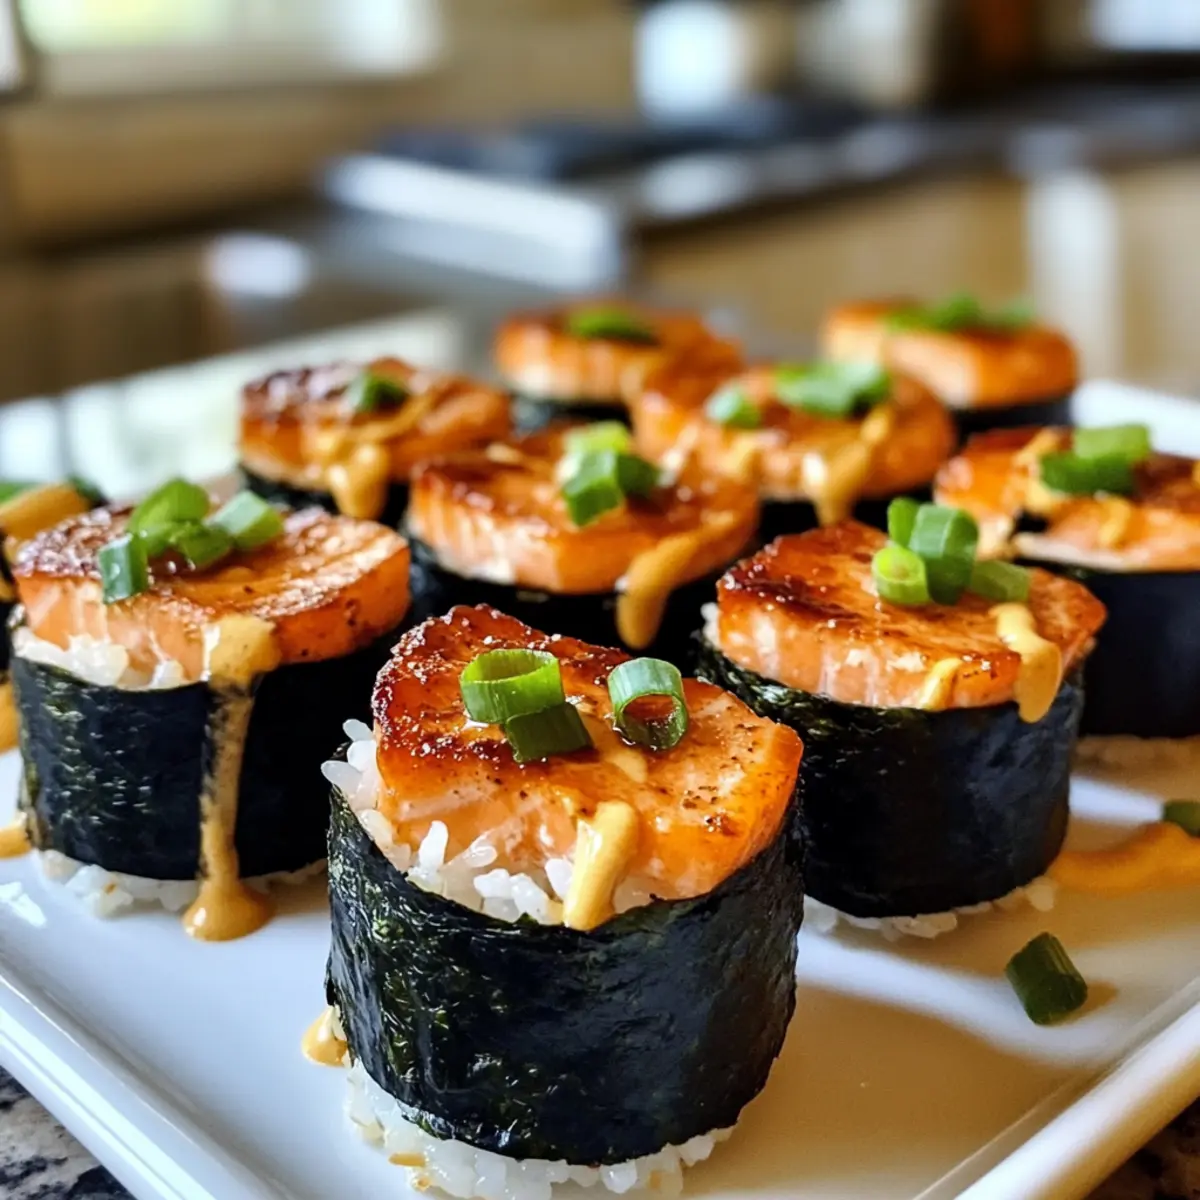
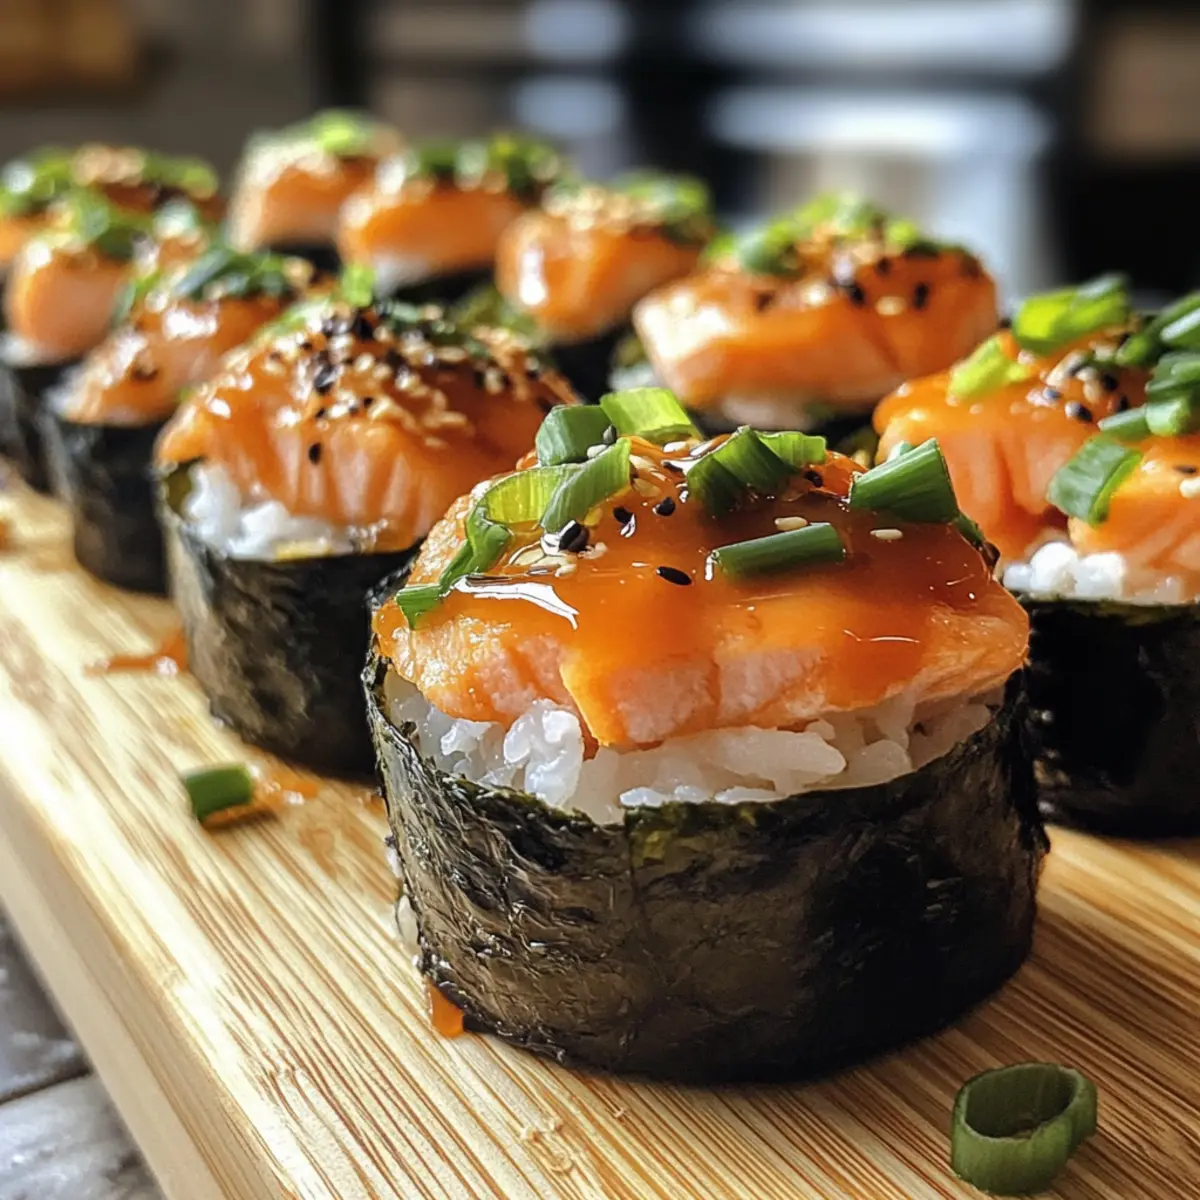
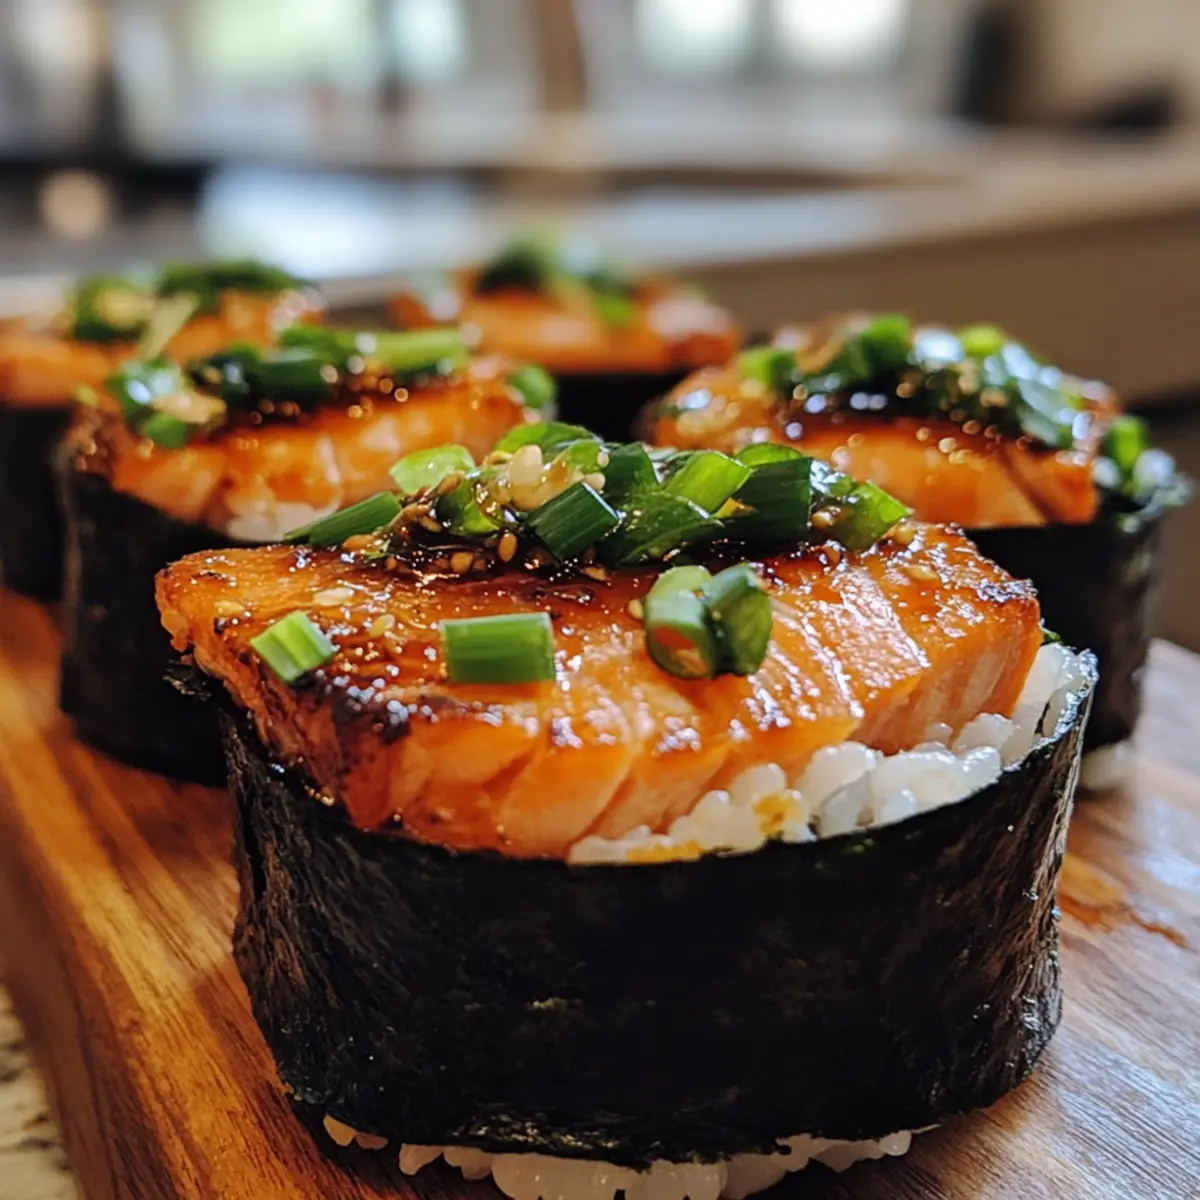
Once baked, remove the sushi cups from the oven and let them cool slightly. For an extra kick, drizzle additional sriracha or Kewpie mayo on top of each cup. Garnish with a sprinkle of furikake and freshly chopped green onions. Serve your delicious Baked Salmon Sushi Cups warm for the best experience!

Baked Salmon Sushi Cups Variations
Feel free to explore your creativity with these Baked Salmon Sushi Cups by making some delicious twists and substitutions!
-
Protein Swap: Replace salmon with cooked shrimp or crab. This switch brings a whole new flavor profile to your sushi cups! You could even mix and match proteins for a delightful seafood medley.
-
Spicier Kick: If you love the heat, amp up the sriracha or switch to your favorite hot sauce. Alternatively, for a milder option, try using sweet chili sauce for a unique flavor twist.
-
Veggie Addition: Add diced avocado or crunchy cucumber for a refreshing bite inside the cups. These ingredients not only enhance the flavor but also add a beautiful pop of color!
-
Dairy-Free: Substitute Kewpie mayo with a dairy-free option or avocado mayonnaise. The creaminess remains, while keeping it suitable for those avoiding dairy.
-
Sushi Rice Twist: Swap traditional sushi rice with quinoa for a healthier grain base. Quinoa will create a delightful nutty flavor and different texture for your cups.
-
Herb Infusion: Mix fresh herbs, like cilantro or basil, into the salmon mixture for a burst of freshness. The right herbs can elevate these sushi cups to new culinary heights!
-
Crunch Factor: Layer in crunchy tempura vegetables or fried shallots on top before serving. This adds an irresistible crunch that will have everyone coming back for more!
-
Asian Fusion: Add a drizzle of teriyaki sauce on top of the finished cups for an authentic twist or serve with sides of wasabi and pickled ginger for a full sushi experience.
As you play around with these variations, don’t hesitate to pair your sushi cups with our crispy baked beef tacos for a fun fusion feast or enjoy them alongside some baked eggs Napoleon for a delightful brunch spread!
Expert Tips for Baked Salmon Sushi Cups
-
Fresh Salmon Only: Ensure that you use fresh or sushi-grade salmon for optimal flavor and safety. Avoid previously frozen or old salmon that may compromise taste.
-
Rice Consistency: Don’t skimp on rinsing sushi rice before cooking. Proper rinsing removes excess starch, preventing gummy rice and ensuring a perfect sticky texture for your Baked Salmon Sushi Cups.
-
Even Cooking: If your oven runs hot or cold, consider using an oven thermometer. Baking times can vary, so start checking for doneness a couple of minutes early for perfectly golden tops.
-
Nori Texture: For an extra crunch, consider using an additional layer of nori sheets in each cup. This small tweak can elevate the texture of your Baked Salmon Sushi Cups significantly.
-
Avoid Overfilling: Be cautious not to overfill the cups with salmon mixture. This may cause spillage and uneven cooking—keep it neat for a beautiful presentation.
-
Customize Your Flavor: Feel free to experiment with different proteins or add favorite vegetables to your sushi cups. This recipe is versatile, allowing you to personalize your Baked Salmon Sushi Cups to your liking!
Make Ahead Options
These Easy Baked Salmon Sushi Cups are perfect for meal prep! You can cook the sushi rice and combine the salmon mixture up to 24 hours in advance—simply refrigerate both in airtight containers. Also, feel free to cut the nori sheets and store them in a dry place to maintain their crispness. When you’re ready to bake, assemble the cups by layering the rice and salmon mixture into the nori-lined muffin tin, then bake for about 15 minutes at 400°F (200°C) until golden. This prep-ahead strategy will save you time and ensure that you have deliciously fresh Baked Salmon Sushi Cups ready to impress with minimal effort!
How to Store and Freeze Baked Salmon Sushi Cups
Fridge: Store leftover Baked Salmon Sushi Cups in an airtight container for up to 3 days to maintain freshness and flavor.
Freezer: You can freeze these sushi cups for up to 1 month. Wrap each cup tightly in plastic wrap, then place them in a freezer-safe bag.
Reheating: To reheat, bake the cups at 350°F (175°C) for about 10 minutes or until heated through and the nori is crispy again.
Serving Fresh: For the best taste experience, enjoy the sushi cups freshly baked, as they’re perfect just out of the oven!
What to Serve with Easy Baked Salmon Sushi Cups?
Transform your gathering into an extraordinary dining experience with delightful pairings that enhance every bite.
-
Pickled Ginger: A classic sushi accompaniment, it adds a refreshing zing that cuts through the richness of the salmon.
-
Soy Sauce: Drizzling a bit of soy sauce on your Baked Salmon Sushi Cups elevates the umami flavors, enhancing the overall taste experience.
-
Creamy Avocado Salad: The creaminess of an avocado salad complements the cups beautifully, adding a fresh and satisfying contrast.
-
Seaweed Salad: This light, tangy dish introduces a lovely crunch and sea flavor, balancing the richness of the sushi cups.
-
Steamed Edamame: Offering a green touch, these tender, salted beans are a healthy side that pairs well with the sushi theme.
-
Sparkling Water with Lime: Clean and refreshing, it acts as a palate cleanser, ensuring you enjoy each sushi cup to the fullest.
-
Miso Soup: A warm bowl provides comforting tones, making it a cozy pairing that harmonizes well with the sushi flavors.
-
Green Tea: The earthy notes of green tea complement the sushi cups while offering a soothing drink option.
These suggested pairings will transform your dinner table into a vibrant assembly of tastes and textures, ensuring your Baked Salmon Sushi Cups shine even brighter!
Baked Salmon Sushi Cups Recipe FAQs
How do I select fresh salmon for my Baked Salmon Sushi Cups?
Absolutely! When selecting salmon, look for firm, bright-colored flesh without any dark spots or a fishy smell. Fresh salmon should have a clean ocean scent, and the skin should be shiny and moist. If possible, opt for sushi-grade salmon, especially if serving raw.
What is the best way to store leftover Baked Salmon Sushi Cups?
To keep your sushi cups fresh, store them in an airtight container in the fridge for up to 3 days. Make sure they’re completely cooled before sealing to avoid moisture buildup. For the best flavor, enjoy them within this timeframe!
Can I freeze Baked Salmon Sushi Cups?
Yes, you can! To freeze, wrap each sushi cup tightly in plastic wrap and then place them in a freezer-safe bag. They will keep well for up to 1 month. When you’re ready to enjoy them, just reheat in the oven at 350°F (175°C) for about 10 minutes until warmed through and slightly crispy.
What if my sushi rice becomes too sticky or gummy?
No worries—this can happen! If your rice turns out too sticky, make sure to rinse it well under cold water until the water runs clear before cooking. This step removes excess starch and helps achieve a better texture. If it’s already cooked, try letting it cool down and folding in a little bit of olive oil or rice vinegar to help loosen it up.
Are Baked Salmon Sushi Cups safe for pets, or can they pose any dietary issues?
Generally, the ingredients in Baked Salmon Sushi Cups are safe for humans but could pose problems for pets. Avoid sharing with dogs and cats as ingredients like soy sauce and sriracha can be harmful to them. If you have dietary allergies to seafood or soy, consult with your doctor before trying this recipe.
How can I customize my Baked Salmon Sushi Cups?
The more the merrier! You can swap out the salmon for cooked shrimp, crab, or even tofu for plant-based options. Feel free to add veggies like avocado, cucumber, or even julienned carrots for extra crunch and flavor. These cups are versatile and can be tailored to your taste preferences!
Baked Salmon Sushi Cups: A Fun Twist on Classic Sushi
Ingredients
Equipment
Method
- Cook the sushi rice according to package instructions, about 20 minutes. Mix rice vinegar and sugar until sugar dissolves, then fold into the rice and set aside to cool.
- Preheat your oven to 400°F (200°C) to prepare for baking.
- In a bowl, combine cubed salmon, light soy sauce, Kewpie mayo, sriracha, and sesame oil. Mix until well coated and creamy. Set aside.
- Cut nori sheets into four squares each to fit in a muffin tin.
- Grease each muffin cup lightly with cooking spray or oil. Place a nori square in each cup and press gently. Add a layer of sushi rice, pressing down lightly.
- Spoon the salmon mixture onto the rice in each cup, ensuring it's evenly distributed but not overflowing.
- Bake for about 15 minutes until golden and the salmon is cooked through.
- Remove from oven, let cool slightly, and drizzle with additional sriracha or Kewpie mayo. Garnish with furikake and green onions. Serve warm.
Leave a Reply