
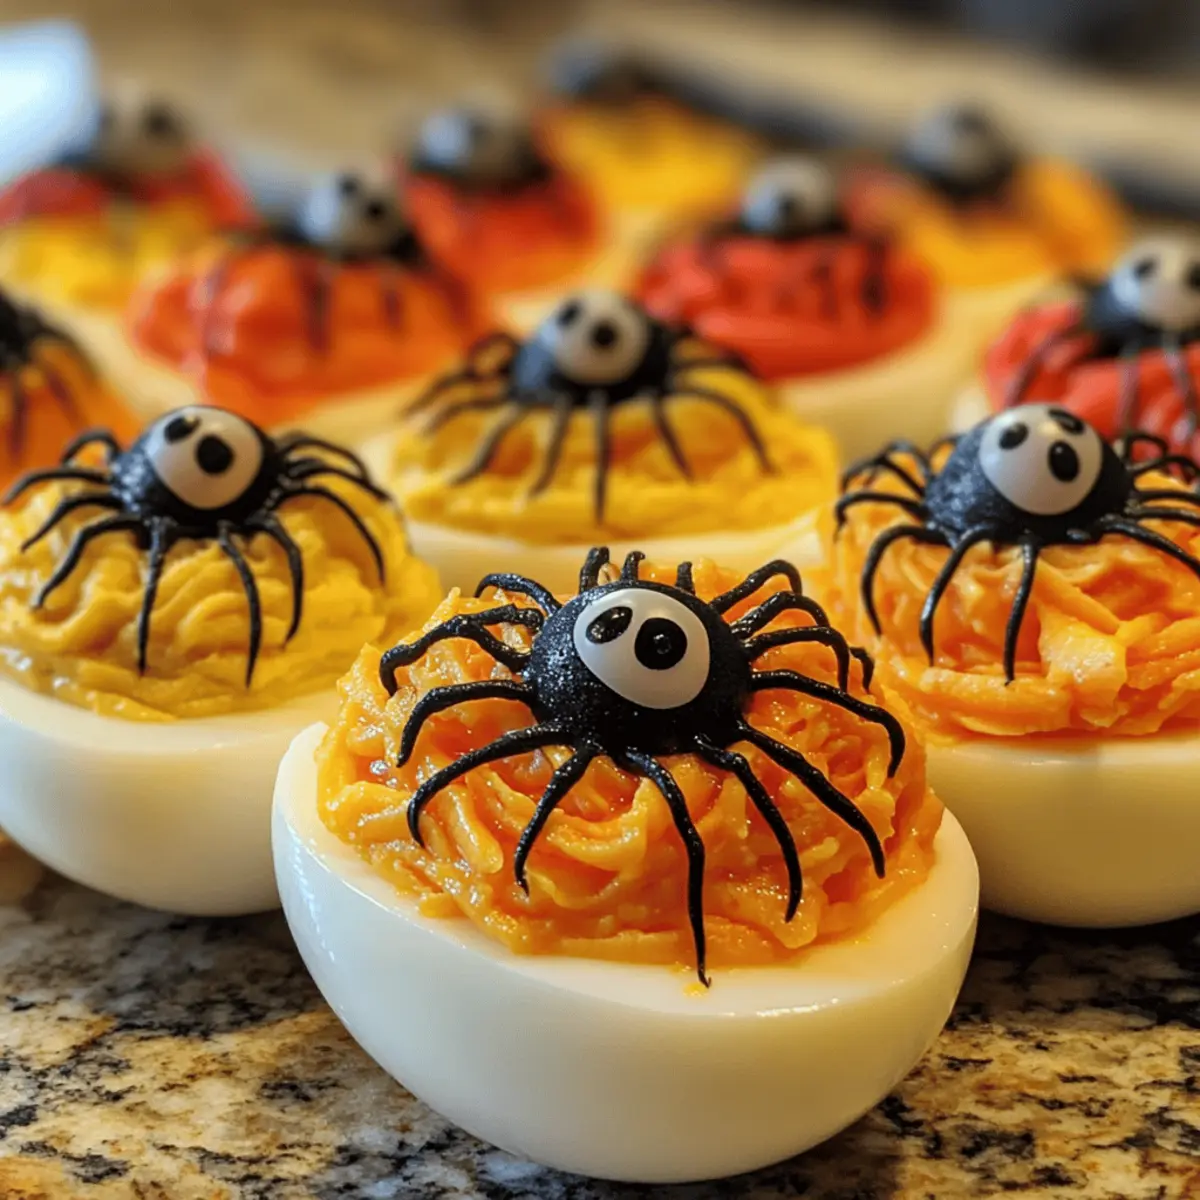
As I rummaged through my pantry for Halloween inspiration, I stumbled upon eggs and suddenly envisioned a spooky twist on a classic favorite. Enter my Creepy Deviled Eggs, where traditional meets terrific in a delightfully frightening presentation. These high-protein appetizers are not only quick to whip up but also ready to steal the show at your spooky soirée. With various colored yolk mixtures and designs like spider and eyeball eggs, they’re guaranteed to captivate your guests and keep your gatherings deliciously fun. Curious about how to make these hauntingly tasty treats? Let’s dive into the details!

Why You’ll Adore These Creepy Deviled Eggs?
Creativity Unleashed: The vibrant colored yolks and spooky designs allow your imagination to run wild, making each egg a masterpiece!
Quick Prep Time: Whip up these crowd-pleasers in just 45 minutes, perfect for those last-minute Halloween plans.
Healthy Indulgence: High in protein and low in carbs, they fit seamlessly into keto or low-calorie diets.
Versatile Options: Want a vegan twist? Simply swap mayo for avocado or plant-based alternatives. You can even try different themes like monster faces!
Guaranteed Fun: Kid and adult-approved, these creepy delights will spark conversations and laughter at your Halloween gatherings. If you’re inspired, check out my Baked Eggs Napoleon for more egg-citing ideas!
Creepy Deviled Eggs Ingredients
For the Egg Base
- Eggs – Fresh eggs are essential for the best flavor and texture in your Creepy Deviled Eggs.
For the Filling
- Mayonnaise – Acts as a creamy binder; substitute with Greek yogurt for a lighter option.
- Mustard – Adds a zesty kick; feel free to replace with vegan mayo for a plant-based twist.
- Vinegar – Enhances overall flavor; use apple cider vinegar for a hint of sweetness.
- Salt – Essential seasoning; fresh herbs can be a great low-sodium alternative.
- Pepper – Adds a touch of warmth to the mixture; adjust to taste.
For the Spooky Coloring
- Food Coloring – Provides a fun visual element; consider black for a “dirt” effect and orange for Halloween spirit.
For Decoration
- Black Olives or Capers – Use these for making spider bodies or other creepy toppings to complete your spooky theme.
- Chives or Black Sesame Seeds – Great for adding a pop of texture and visual interest!
Step‑by‑Step Instructions for Creepy Deviled Eggs
Step 1: Boil Eggs
Start by placing fresh eggs in a medium saucepan and cover them fully with cold water. Bring the water to a rolling boil over medium-high heat, then cover the pan, reduce the heat to low, and let them simmer for 12 minutes. Once cooked, you’ll see the eggs firming up; this is the perfect time to get your ice bath ready.
Step 2: Cool & Peel
Carefully transfer the boiled eggs into a bowl filled with ice water and let them chill for about 10 minutes. This step not only cools the eggs but also makes peeling easier. Once cool enough to handle, gently tap each egg on the counter and peel under running water to ensure a clean shell removal, revealing the pristine whites for your Creepy Deviled Eggs.
Step 3: Prepare Filling
With the peeled eggs, slice each one in half lengthwise using a sharp knife. Gently scoop out the yolks into a mixing bowl, trying not to break the egg whites. Mash the yolks with a fork until crumbly, then mix in mayonnaise, mustard, vinegar, salt, and pepper to create a smooth filling. This rich blend will be the flavorful base for your deviled eggs.
Step 4: Color Mixtures
Next, divide the yolk mixture into three bowls for coloring. For a spooky twist on your Creepy Deviled Eggs, add food coloring—black for a “dirt” effect, orange for that Halloween flair, and perhaps a spooky green! Mix each bowl until you achieve vibrant and distinct colors and enjoy the creative process of bringing your egg filling to life.
Step 5: Assemble Eggs
Now it’s time to fill the egg whites with your colorful yolk mixtures. Using a piping bag or a spoon, carefully layer the different colors into each egg white half, creating fun patterns. For additional freaky flair, top them with black olives or capers to resemble spiders, or use chopped chives for decoration. Let your creativity take the lead while assembling these eye-catching Creepy Deviled Eggs.
Step 6: Chill & Serve
Once fully assembled, place your deviled eggs on a serving platter and cover them with plastic wrap. Refrigerate for at least 30 minutes to allow the flavors to meld and the presentation to set nicely. Serve these chilling creations well-chilled for maximum impact, and watch your guests delight in the eerie yet delicious taste of your Creepy Deviled Eggs!

Creepy Deviled Eggs Variations
Feel free to get creative and tailor these delightful spooky treats to match your taste buds and dietary needs!
-
Avocado Filling: Swap mayonnaise for mashed avocado for a creamy, healthy twist. This adds a vibrant green that fits perfectly with Halloween themes!
-
Vegan Alternative: Use plant-based mayonnaise instead of traditional mayo for a delicious vegan version. This ensures everyone can enjoy your spooky creations!
-
Spicy Kick: Add a hint of sriracha or hot sauce to the yolk mixture for a thrilling heat that’s sure to surprise your guests. It pairs wonderfully with the creamy filling!
-
Monster Faces: Use tiny bits of bell peppers and olives for creating fun monster faces on your deviled eggs. A little creativity turns your appetizers into playful delights!
-
Herbal Infusion: Mix in fresh herbs like dill or cilantro for a fragrant twist that complements the creaminess and adds a fresh flavor dimension.
-
Rainbow Theme: Experiment with multiple food coloring options within the yolk to create a rainbow effect, making your deviled eggs visually stunning at any gathering.
-
Pasta & Egg Twist: Use finely chopped cooked pasta in the yolk mixture for a unique texture addition! This unexpected twist gives an extra bite to your deviled eggs.
-
Classic Inspired: Channel your inner tradition by trying the original recipe, akin to my Baked Eggs Napoleon. Sometimes, the classics reign supreme!
Make Ahead Options
These Creepy Deviled Eggs are a fantastic option for meal prep, saving you valuable time during your Halloween festivities! You can prepare the filling up to 24 hours in advance; simply make the yolk mixture and refrigerate it in an airtight container to keep it fresh. Keep the egg whites separate and filled only when you’re ready to serve, as this maintains their crisp texture and prevents sogginess. When it’s time to impress your guests, simply fill the egg whites with the chilled yolk mixture, decorate them with your favorite toppings, and enjoy the seamless blend of spooky and delicious flavors!
Storage Tips for Creepy Deviled Eggs
Fridge: Store your filled Creepy Deviled Eggs in an airtight container in the refrigerator for up to 3 days. Layer parchment paper between the eggs to prevent sticking.
Room Temperature: Keep your deviled eggs chilled until serving to maintain freshness. They should not be left out at room temperature for more than 2 hours.
Avoid Freezing: Do not freeze the completed eggs as this can negatively affect their texture. Instead, consider freezing the yolk mixture separately if you plan to make batches ahead of time.
Reheating: While deviled eggs are best served cold, if necessary, allow them to sit at room temperature for a few minutes before serving for a slight softening effect.
What to Serve with Creepy Deviled Eggs?
Elevate your Halloween gathering with a delightful spread that complements the eye-catching Creepy Deviled Eggs we just made!
- Mummy-Wrapped Hot Dogs: These whimsical treats add a fun, savory contrast and are easy for guests to grab and enjoy.
- Pumpkin Spice Hummus: This creamy, spiced dip pairs perfectly with crunchy vegetables, invigorating your spread with a touch of sweetness.
A balance of flavors and textures makes for a memorable feast. Complement the savory and spooky vibe with a mix of hearty and light offerings!
- Spooky Charcuterie Board: Incorporate eerie cheeses, cured meats shaped like tombstones, and black olives for a visually enticing platter, inviting everyone to indulge.
- Witch’s Brew Punch: A refreshing, vibrant drink featuring citrus and a splash of soda will complement the rich deviled eggs, keeping the spirits high.
With these options, you’ll create a table that’s as appetizing as it is festive! Don’t forget to add in some colorful decorations to set the mood.
- Chocolate-Covered Pretzel Bats: These crunchy treats deliver a sweet and salty finish that satisfies dessert cravings while maintaining the Halloween theme.
- Ghostly Fruit Cups: Fresh fruit topped with yogurt “ghosts” make for a refreshing complement to the hearty deviled eggs and add a playful touch to the dessert spread.
Expert Tips for Creepy Deviled Eggs
• Fresh Eggs: Always use the freshest eggs possible for your Creepy Deviled Eggs; older eggs can be difficult to peel and will affect the presentation.
• Coloring Technique: When adding food coloring, start with small amounts and mix gradually to avoid overwhelming the yolk mixtures—aim for vibrant yet balanced colors!
• Filling Spills: To prevent messy fillings, use a piping bag or a zip-top bag with a corner snipped off when adding the yolk mixture to the egg whites.
• Avoiding Overcooking: Keep an eye on cooking times! Overcooked eggs can develop a grayish-green ring around the yolks, affecting both appearance and taste.
• Decoration Ideas: Get creative with toppings! Use sliced olives for spiders or tiny chives for “hair”; this enhances the fun and visual interest of your Creepy Deviled Eggs.

Creepy Deviled Eggs Recipe FAQs
How do I choose the right eggs for my Creepy Deviled Eggs?
Absolutely! Fresh eggs are key to achieving the best flavor and texture in your Creepy Deviled Eggs. Look for eggs without any cracks or dark spots, and ideally, stick with those that have been recently laid, as they’ll be easier to peel and yield a beautiful presentation.
How should I store leftover Creepy Deviled Eggs?
You can keep your filled Creepy Deviled Eggs in an airtight container in the refrigerator for up to 3 days. To prevent them from sticking together, layer parchment paper between the eggs. Always make sure to keep them chilled until serving to retain their freshness and flavor.
Can I freeze the filling for Creepy Deviled Eggs?
Yes, you can! If you’d like to prepare in advance, you can freeze the yolk mixture separately for up to 3 months. To do this, scoop the yolk mixture into an airtight freezer bag, remove as much air as possible, and lay it flat to freeze. When you’re ready to use it, simply thaw it in the fridge overnight and then combine with the egg whites before serving.
What should I do if my eggs are difficult to peel?
Very! If your eggs are hard to peel, try this method: when boiling, add a teaspoon of baking soda to the water. This can help raise the pH level and make peeling easier. Also, always transfer cooked eggs to an ice water bath immediately after boiling them for about 10 minutes; this will help the shells come off more cleanly.
Are these Creepy Deviled Eggs suitable for those with dietary restrictions?
Sure! If you’re catering to dietary restrictions, these creepy delights can easily be adapted. For a vegetarian option, simply replace mayonnaise with avocado or plant-based mayo. Be mindful of allergies, particularly to eggs or dairy, and adjust accordingly. Always check labels if using pre-packaged ingredients to ensure they meet dietary needs.
Can I make different designs with my Creepy Deviled Eggs?
Absolutely! The fun part of making Creepy Deviled Eggs is getting creative with designs! You can create spooky spider eggs using black olives for the spider bodies and chives for legs or even eyeball eggs using a slice of olive for the pupil. Let your imagination run wild and enjoy the festive fun!
Creepy Deviled Eggs for a Spook-tacular Halloween Treat
Ingredients
Equipment
Method
- Start by placing fresh eggs in a medium saucepan and cover them fully with cold water. Bring the water to a rolling boil, cover, reduce heat to low, and simmer for 12 minutes.
- Carefully transfer the boiled eggs into a bowl filled with ice water and let them chill for about 10 minutes.
- Slice each egg in half lengthwise and scoop out the yolks into a mixing bowl. Mash yolks and mix in mayonnaise, mustard, vinegar, salt, and pepper.
- Divide the yolk mixture into three bowls for coloring, adding food coloring to achieve distinct colors.
- Fill the egg whites with the colorful yolk mixtures using a piping bag or spoon, and decorate with black olives or chives.
- Refrigerate the assembled eggs for at least 30 minutes before serving.
Leave a Reply